Your first AI agent in 30 minutes
Here we build a Telegram bot with an AI assistant that can search the internet. You send the bot a question, it thinks, searches for an answer if needed, and sends the result back to the same chat.
What you will have:
- A Telegram bot that accepts questions and replies in the same chat
- An AI agent with access to web search via Perplexity AI
- Context memory: the bot keeps a separate conversation history for each user
Time: 30 minutes
Level: Intermediate
You need: A Latenode account and a Telegram bot (see Telegram Bot for how to create one)
How it works
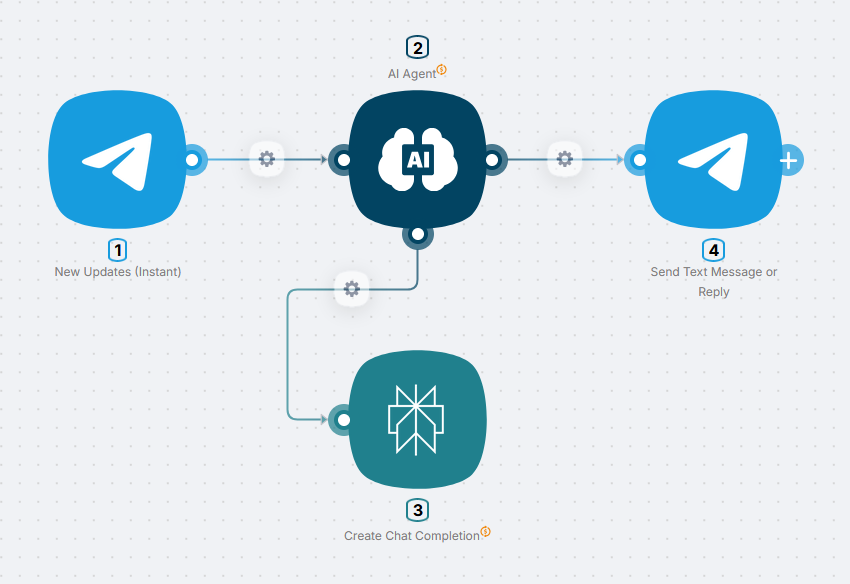
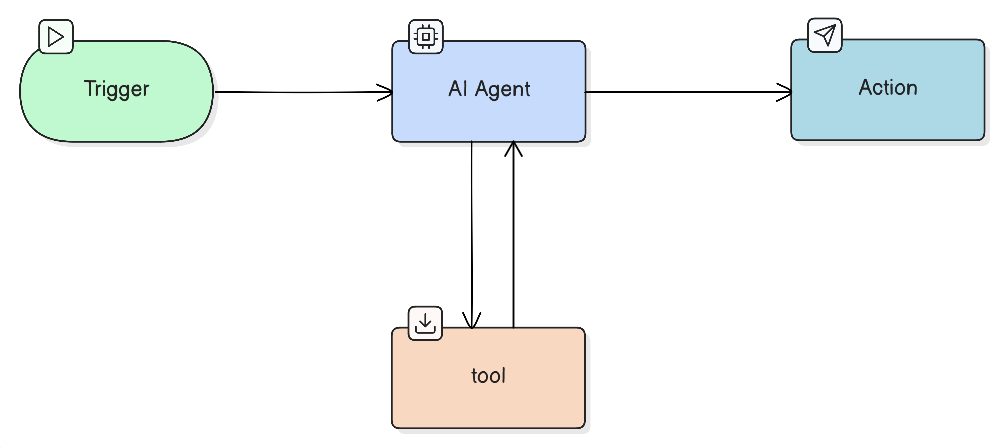
When a user sends the bot a message, the Telegram trigger fires and passes the message text to the AI agent. The agent evaluates the request: if the answer is straightforward it replies directly; if it needs fresh data it calls the Perplexity Search tool. The final answer is returned to the user via the Telegram - Send Message node.
Step 1 - Create the scenario
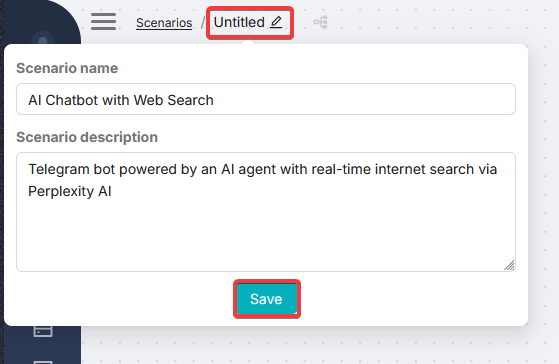
Open Latenode and click Create scenario (or New Scenario). Give the scenario a clear name, for example "Telegram AI Assistant", and click Save.
Step 2 - Add the Telegram trigger
The trigger defines when the scenario runs. Here it is an incoming message to the Telegram bot.
If you have not created a Telegram bot or obtained a token yet, go through the Telegram Bot guide first. Without a token you cannot connect the trigger.
Add the trigger node
Click Add node in the center of the canvas, search for Telegram, and choose Telegram Bot - New Message under Triggers.
Configure the connection
Click the Telegram Bot - New Message node to open its settings, click Create Authorization, enter the bot token, and click Save.
Full instructions for creating a bot and getting the token are on the Telegram Bot page.
Get the first data from the trigger
To configure the next nodes the agent needs real data from Telegram. Click Run Once in the bottom panel - the scenario will start and wait for an incoming message. Send something to your bot in Telegram; the trigger will catch it and the data will appear in the chain.
Step 3 - Set up the AI agent and search tool
The AI agent and its tools form a single unit. Add both nodes to the canvas and connect them first, then configure each one.
Add nodes to the canvas
Click the right connector on Telegram Bot - New Message and choose AI Agent.
Add Perplexity AI: via the bottom connector of AI Agent (the plus button) or as a separate node with a manual connection to that same connector.
You now have three nodes on the canvas: Telegram trigger → AI Agent ← Perplexity AI. Time to configure them.
Configure AI Agent
Click AI Agent to open its settings panel. In the Model field, leave the default if the suggested model works for you, or change it in the list later.
Session ID defines the agent's memory. Pass the user ID here so each person who writes to the bot gets their own separate conversation history. Click the field, open the Data tab, and select from.id from the Telegram Bot - New Message node.
- Empty value - the agent has no memory: every new message is treated as a fresh conversation
- Fixed string - all users share one memory pool, even if different people write to the bot
User Prompt is what the agent treats as input from the user (in this scenario, the text from Telegram). Map it from the Data tab of the trigger - typically message → text from Telegram Bot - New Message.
System Message (sometimes shown as System Prompt in the UI) contains the system instructions: how the agent should behave (role, tools, rules). This is not an assistant reply in the chat; it configures the model's behavior. Below is a sample:
The Prompting guide covers how to write effective instructions in detail. Read it when you are ready to refine the scenario.
<role>
You are a smart AI assistant embedded in a Telegram bot. Be concise, helpful, and friendly.
</role>

<tools>
You have access to the internet_search tool for finding current information online.
Use it when the user asks about: news, current events, exchange rates, weather, facts about companies or people, or any data that may be outdated.
Answer straightforward or well-known questions directly without searching.
</tools>

<instructions>
- Reply in the language the user writes in.
- If you use search, briefly mention the source or the date of the data.
- If you do not have enough information, ask the user to clarify.
</instructions>
Click Save in the AI Agent panel.
Configure the Perplexity tool
Tools are described in text: in Tool name set the name the agent will use to call the node (for example internet_search). In Tool Description briefly describe when the tool is needed so the model does not get confused. Example:
Searches for current information online. Use when fresh data is needed: news, current events, exchange rates, weather, facts about companies and people.For the AI agent to pass requests to other nodes, insert the From AI Agent operator into the relevant fields. Click the field and choose Let AI decide next to the field, or select the operator from the Operators tab.
For more on operators with AI agents, see Operators and AI agent.
The From AI Agent operator is the agent's "hands". When it is in a field, the agent knows it must fill in those specific fields when calling the tool.
The name in Tool name and the name in the agent's system prompt must match. If they differ, the model and the scenario refer to different things. It is best to write explicitly in the prompt, for example: "use internet_search".
Click Save.
Step 4 - Test the agent
You can test the agent directly in its settings panel - no need to message the real bot.
Chat in the agent settings
In the AI Agent panel open AI Chat. You can verify the prompt and tool calls before publishing, without a real bot.
First try a simple question like Hello: the agent replies without calling Perplexity because the prompt does not require a search. Then try a query that needs fresh data, for example What are the top headlines in tech news today? - you will see the Perplexity tool being called. In a real scenario the logic is the same: if a message requires a search according to the system prompt, the agent calls the tool; otherwise it answers directly.
If the tool's fields contain the From AI Agent operator, do not run that node on its own (Run once): there will be no data from the agent and the node will most likely return an error. Test tools only through the agent (the AI Chat panel or the full scenario run) so the request is formed by the AI agent.
Step 5 - Add the Telegram reply
After step 4, the agent is tested in AI Chat. Next you need the AI Agent node's output data - so you can select it when configuring the Telegram node. To do this, click Run once on the AI Agent node itself (right-click context menu or the node panel). The node will execute and store its result - you will be able to pick it in the Data tab inside Send Message.
Add Telegram Bot - Send Message from the AI Agent connector, create an authorization if needed (same as the trigger). In Text map the AI Agent reply from the Data tab. In Chat ID use chat.id from Telegram Bot - New Message (the same chat as in step 2) so the bot replies to the conversation it was written from. Click Save.
Step 6 - Publish the scenario
Turn on the Active toggle and click Deploy (bottom panel of the editor). After deploying, the AI agent runs autonomously: write to the bot in Telegram and the scenario will fire, with the agent replying in the same chat.
Done! Write to the bot in Telegram - it autonomously handles incoming messages and replies in the same chat (with web search when the System Message calls for it).
What you learned
You can now:
- ✅ Build scenarios with a Telegram trigger
- ✅ Configure an AI agent: model, memory (Session ID), prompt
- ✅ Connect tools to the agent and describe them
- ✅ Test the agent in the built-in chat window
- ✅ Publish the scenario and receive messages in real time
Your first scenario in 15 minutes
Build a morning news digest in 15 minutes with no code and no API keys.
How to Plan a Scenario
What to think through before building an automation
Need Help? Ask the community
If something on this page is missing or unclear, post on the Latenode community forum. Our team and other users usually reply quickly.